Git Basics
Some basic git commands and workflows
Courtesy of rogerdudler.github.io
Create a Repo
Create a new repo with git init:
bbearce@bbearce-XPS-15-9560:~/Desktop/git_practice$ git init
Initialized empty Git repository in /home/bbearce/Desktop/git_practice/.git/
Checkout a Repo
Checkout a repo with git clone:
$ git clone /path/to/repository
When using a remote server, your command will be:
git clone username@host:/path/to/repository
Workflow
Your local repository consists of three "trees" maintained by git. the first one is your Working Directory which holds the actual files. The second one is the Index which acts as a staging area and finally the HEAD which points to the last commit you've made.

Add and Commit
Basics
You can propose changes (add it to the Index) using:
git add <filename>
or
git add *
This is the first step in the basic git workflow. To actually commit these changes use:
git commit -m "Commit message"
Now the file is committed to the HEAD, but not in your remote repository yet.
git remote -vwill tell you which remote you are connected to.
SYNOPSIS
       git remote [-v | --verbose]

...

OPTIONS
       -v, --verbose
           Be a little more verbose and show remote url after name. NOTE: This must be placed between remote and subcommand.
Add hunks
You can use:
git add --patch <filename>
or for short:
git add -p <filename>
Git will break down your file into what it thinks are sensible "hunks" (portions of the file). It will then prompt you with this question:
Stage this hunk [y,n,q,a,d,/,j,J,g,s,e,?]?
Here is a description of each option:
- y stage this hunk for the next commit
- n do not stage this hunk for the next commit
- q quit; do not stage this hunk or any of the remaining hunks
- a stage this hunk and all later hunks in the file
- d do not stage this hunk or any of the later hunks in the file
- g select a hunk to go to
- / search for a hunk matching the given regex
- j leave this hunk undecided, see next undecided hunk
- J leave this hunk undecided, see next hunk
- k leave this hunk undecided, see previous undecided hunk
- K leave this hunk undecided, see previous hunk
- s split the current hunk into smaller hunks
- e manually edit the current hunk You can then edit the hunk manually by replacing +/- by # (thanks veksen)
- ? print hunk help
Undo a Commit
Note: really good notes on the diff between reset, revert and rebase here.
Reset
There are two main ways to undo commits: * soft: commit undone and changes left un-staged
git reset --soft HEAD~1
- hard: commit undone and changes completely removed (lost forever)
git reset --hard HEAD~1
Here the ~1 indicates go back one commit
Revert
In Git, the revert command is used to perform a revert operation, i.e., to revert some changes. It is similar to the reset command, but the only difference here is that you perform a new commit to go back to a particular commit. In short, it is fair to say that the git revert command is a commit.
The Git revert command does not delete any data while performing the revert operation.
Rebase
Rebase can sometimes be a little confusing to understand because it is very similar to a merge. The goal of merging and rebasing both is to take the commits from my feature branch and put them on to a master branch or any other branch.
Get yourself into the right state which is an up to date develop\main branch and then checkout your feature branch which is a little behind develop\main but has a new feature.
Ex:
bbearce@pop-os:~/Documents/codabench$ git checkout download_buttons
Switched to branch 'download_buttons'
Your branch is up to date with 'origin/download_buttons'.

bbearce@pop-os:~/Documents/codabench$ git branch
  develop
* download_buttons
Adding a New Remote
Courtesy of articles.assembla.com
To add a new remote, use the git remote add command on the terminal, in the directory your repository is stored at.
The git remote add command takes two arguments:
- A remote name, for example, “origin”
- A remote URL, which you can find on the Source sub-tab of your Git repo
#set a new remote
git remote add origin git@git.assembla.com:portfolio/space.space_name.git

#Verify new remote
git remote -v

origin  git@git.assembla.com:portfolio/space.space_name.git (fetch)
origin  git@git.assembla.com:portfolio/space.space_name.git (push)
Pushing Changes
Your changes are now in the HEAD of your local working copy. To send those changes to your remote repository, execute:
git push origin master
Change master to whatever branch you want to push your changes to.
If you have not cloned an existing repository and want to connect your repository to a remote server, you need to add it with:
git remote add origin <server>
Now you are able to push your changes to the selected remote server.
Push Without User:Pass
Courtesy of medium.com
A way to skip typing my username/password when using https://github, is by changing the HTTPs origin remote which pointing to an HTTP url into an SSH url.
For example:
https url: https://github.com/<Username>/<Project>.git
ssh url: git@github.com:<Username>/<Project>.git
You can do:
git remote set-url origin git@github.com:<Username>/<Project>.git
to change the url.
You need to have an ssh key pair generated and added to github
Steps:
[1]. Generate Key Pair
Open Terminal.
Paste the text below, substituting in your GitHub email address.
$ ssh-keygen -t rsa -b 4096 -C "your_email@example.com"

Generating public/private rsa key pair.
This creates a new ssh key, using the provided email as a label. When you're prompted to "Enter a file in which to save the key," press Enter. This accepts the default file location.
Enter a file in which to save the key (/home/you/.ssh/id_rsa): [Press enter]
At the prompt, type a secure passphrase. For more information, see Working with SSH key passphrases.
Enter passphrase (empty for no passphrase): [Type a passphrase]> Enter same passphrase again: [Type passphrase again]
[2]. Add public key to git account or Add public key to git repo
Possible Issues:
If you get this error:
ERROR: Permission to bbearce/code-journal.git denied to deploy key
fatal: Could not read from remote repository.

Please make sure you have the correct access rights
and the repository exists.
You need to add your ssh key to the ssh-agent. Before adding a new SSH key to the ssh-agent to manage your keys, you should have checked for existing SSH keys and generated a new SSH key.
If you have checked for existing SSH keys and find one you want to use, follow the below instructions.
- Start the ssh-agent in the background.
$ eval "$(ssh-agent -s)"
> Agent pid 59566
- Add your SSH private key to the ssh-agent. If you created your key with a different name, or if you are adding an existing key that has a different name, replace id_rsa in the command with the name of your private key file.
$ ssh-add ~/.ssh/<your_ssh_key>
not the
.pub file but the file with no extension.
Add the SSH key to your GitHub account.
Access Token
This link above helps setup a way to push with access tokens.
Branching
Branches are used to develop features isolated from each other. The master branch is the "default" branch when you create a repository. Use other branches for development and merge them back to the master branch upon completion.
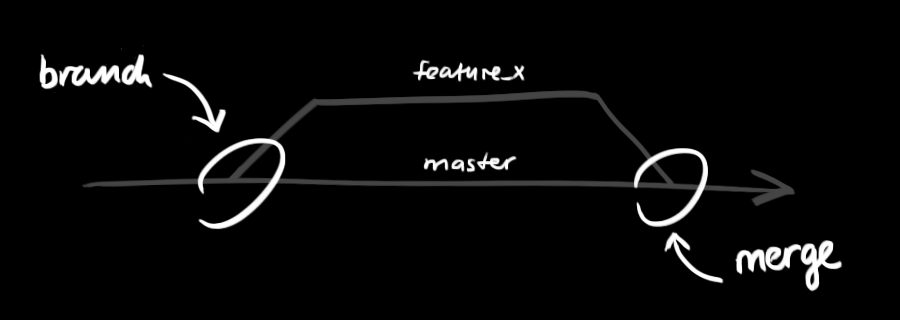
Create a new branch named "feature_x" and switch to it using:
git checkout -b feature_x or git branch feature_x
When switching to a new branch commit changes to master before switching. Also same for the new branch when switching to back to master.
Switch back to master:
git checkout master
Delete the branch again:
git branch -d feature_x
A branch is not available to others unless you push the branch to your remote repository:
git push origin <branch>
Show remote branches and their local associations
git remote show origin
See what remote branch your local branch is tracking
git branch -vv
Ex:
debian@codabench-test-acl-220627:~/codabench$ git branch -vv
  develop                   46c1ff7 [origin/develop] Merge pull request #696 from codalab/remove-vnc
* leaderboard_v2_comp_fixes 7c2811e edit compute worker so that yaml gets correct amount of inputs
local develop tracks remote develop branch at remote "origin". leaderboard_v2_comp_fixes is currently not tracking a remote branch
Add local branch to remote
git push -u origin <branch>
# short for
git push --set-upstream origin <branch>
Check out a PR from your repo's branch or another's:
Check out a pr to a local branch
git fetch origin pull/763/head:anyname
git checkout anyname
Update and Merge
To update your local repository to the newest commit, execute:
git pull
In your working directory to fetch and merge remote changes. To merge another branch into your active branch (e.g. master), use:
git merge <branch>
In both cases git tries to auto-merge changes. Unfortunately, this is not always possible and results in conflicts. You are responsible to merge those conflicts manually by editing the files shown by git. After changing, you need to mark them as merged with:
git add <filename>
Before merging changes, you can also preview them by using:
git diff <source_branch> <target_branch>
Undo Merge
Source freecodecamp
Use git reflog to find commit before merge. Why? Because what if you merged in like 30 commits (I did). Then you have to go one by one to find the correct commit to go back to.
Checkout reflog at the bottom of this page under Useful Hints.
Using merge (safer)
Git provides a safer flag which is --merge. Use the HEAD keyword with the --merge flag by running git reset --merge HEAD~1.
Run git reset --merge <previous-commit> for a specific commit.
If you don’t get a response from this command when you use the --merge flag, don’t worry, it works.
Using reset (dangerous)
If you are not sure of the hash of the last commit, you can run git reset --hard HEAD~1 to go back to the commit before the merge
When you get the hash of the commit you want to get back to, run git reset --hard <commit-before-the-merge>
Tagging
It's recommended to create tags for software releases. This is a known concept, which also exists in SVN. You can create a new tag named 1.0.0 by executing:
git tag 1.0.0 1b2e1d63ff
The 1b2e1d63ff stands for the first 10 characters of the commit id you want to reference with your tag. You can get the commit id by looking at the...log.
Log
In its simplest form, you can study repository history using:
git log
You can add a lot of parameters to make the log look like what you want. To see only the commits of a certain author:
git log --author=bob
To see a very compressed log where each commit is one line:
git log --pretty=oneline
Or maybe you want to see an ASCII art tree of all the branches, decorated with the names of tags and branches:
git log --graph --oneline --decorate --all
See only which files have changed:
git log --name-status
These are just a few of the possible parameters you can use. For more, see git log --help
Replace Local Changes
In case you did something wrong, which for sure never happens ;), you can replace local changes using the command:
git checkout -- <filename>
This replaces the changes in your working tree with the last content in HEAD. Changes already added to the index, as well as new files, will be kept.
If you instead want to drop all your local changes and commits, fetch the latest history from the server and point your local master branch at it like this:
git fetch origin
git reset --hard origin/master
Fetching Remote Branch
Update:
A new command, git switch has been added that simplifies the effort.
If daves_branch exists on the remote repository, but not on your local branch, you can simply type:
git switch daves_branch
Since you do not have the branch locally, this will automatically make switch look on the remote repo. It will then also automatically set up remote branch tracking.
Original Way:
Checking out a local branch from a remote-tracking branch automatically creates what is called a “tracking branch” (and the branch it tracks is called an “upstream branch”). Tracking branches are local branches that have a direct relationship to a remote branch. If you’re on a tracking branch and type git pull, Git automatically knows which server to fetch from and which branch to merge in.
When you clone a repository, it generally automatically creates a master branch that tracks origin/master. However, you can set up other tracking branches if you wish — ones that track branches on other remotes, or don’t track the master branch. The simple case is the example you just saw, running git checkout -b <branch> <remote>/<branch>. This is a common enough operation that Git provides the --track shorthand:
$ git checkout --track origin/serverfix
Branch serverfix set up to track remote branch serverfix from origin.
Switched to a new branch 'serverfix'
In fact, this is so common that there’s even a shortcut for that shortcut. If the branch name you’re trying to checkout (a) doesn’t exist and (b) exactly matches a name on only one remote, Git will create a tracking branch for you:
$ git checkout serverfix
Branch serverfix set up to track remote branch serverfix from origin.
Switched to a new branch 'serverfix'
To set up a local branch with a different name than the remote branch, you can easily use the first version with a different local branch name:
$ git checkout -b sf origin/serverfix
Branch sf set up to track remote branch serverfix from origin.
Switched to a new branch 'sf'
Now, your local branch sf will automatically pull from origin/serverfix.
If you already have a local branch and want to set it to a remote branch you just pulled down, or want to change the upstream branch you’re tracking, you can use the -u or --set-upstream-to option to git branch to explicitly set it at any time.
$ git branch -u origin/serverfix
Branch serverfix set up to track remote branch serverfix from origin.
Useful Hints
log
General
git log - shows commits.
Commit diff between branches
2 dots:
Suppose you are on myBranch, and you want to see only changes SINCE branching from master.
git log --oneline master..myBranch
3 dots:
The three-dot version gives all changes from the tip of master to the tip of myBranch
git log --oneline master..myBranch
Reflog
Reference logs, sometimes known as "reflogs" keep track of when the tips of branches and other references in the local repository are modified. Reflogs can be used in various Git operations to specify the previous value of a reference.
git reflog <subcommand> <options>
The git reflog can be found in the “.git” directory under the following paths:
.git/logs/refs/heads/
.git/logs/HEAD
.git/logs/refs/stash #if stash has been utilised
Default (git reflog):
git reflog show
Ouptut:
82cdf5f (HEAD -> download_buttons) HEAD@{0}: merge develop: Merge made by the 'ort' strategy.
81fade0 HEAD@{1}: checkout: moving from develop to download_buttons
8b575df (origin/develop, origin/HEAD, develop) HEAD@{2}: pull: Fast-forward
f55e5cc HEAD@{3}: pull: Fast-forward
2b8de96 HEAD@{4}: checkout: moving from manual_comp_create_queue to develop
eca5272 (origin/manual_comp_create_queue) HEAD@{5}: commit: remove debug statement
c035cbe HEAD@{6}: commit: undefined calendar var in initial phase creation
Gitk
If you want a built-in git GUI, use:
gitk
Use colorful git output:
git config color.ui true
To show log on just one line per commit, use:
git config format.pretty oneline
Use interactive adding:
git add -i
Clone Single Branch
Courtesy of stackoverflow
git clone -b <mybranch> --single-branch <git-url>